Following, are "snapshots" of my completed Beast OTL Monos. It's been a very long road (about 15 months on and off) to complete these, but after listening to, and looking at the finished product, I don't regret a moment spent. The project has only changed subtly from the 3D shots I published a year and a half ago. The gauge is no longer a "Sifam", rather, they are industrial spec custom units from Hoyt meter in New Hampshire. They are an identical electrical spec to the original Chinese Xicon edgewise meters, just much tougher (particularly heat tolerant) and durable. The acrylic gauge bezel has been restyled, as have the art deco bars on the convection basket fascia, but essentially everything else has remained as planned.
Because I'm no circuit designer and only understand the basics, I have left the audio circuit exactly as Bruce has intended, so as always, in all things, "if you don't understand it intimately, don't mess with it". The exception was the "Mundorf" Silver/Gold signal caps, which are a straight substitution, and were easier to install during the build rather than later. I've had great results with my modified GG Pre using these caps, so I hoped for similar improvement with the Beasts.
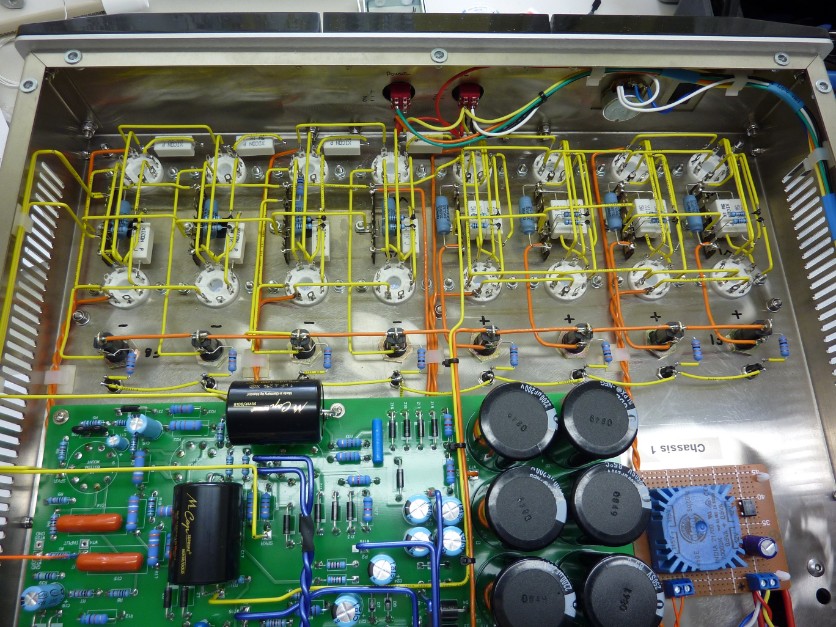
I did however, design the power relay circuit and the lighting circuit for the LED's on the gauge and front fascia. The lighting circuit is completely independent to the audio circuit, and you'll see a small stand alone board I made up to accept 240Vac, toroid down to 12Vac, then rectify, smooth, and away you go. It's all point to point wiring under the board in micro wires. Phew! There was no way I was going to tap into the audio board to run the LED's without understanding it fully, so I left it alone. The fascia LED's are too bright which you'll see in the night shots below, so I'll attenuate these down 70% with more resistance next time I've got these units on the workbench.
The wiring style may seem a little "Alien" to most of you, I'm not electrically oriented, I'm mechanical, so I have no formal training in wiring. But there are some basics that I've taken on board over time after several projects.
- Keep your signal and power wiring as segregated as is practical. Shield with steel/u-metal for EMI, and copper for RFI if you still have interference issues.
- If the ambient temp inside a chassis is getting pretty warm, (like the area under tube sockets), keep the wiring insulation and components well aired and spaced apart if you can. My entire output stage is done this way to keep lots of air moving around the insulation and components. I had to develop a new method of making joins to achieve this layout. After trying several methods I ended up using a pair of jewelers pliers designed for making chains and links, which have conical shaped jaws. "Stahlwillie" make an excellent pair which I use (see 1st photo). These allowed me to make very fast accurate loops, in various diameters, in the ends of solid and multi-strand wires, and component flying leads. For muli-strand, twist the wires together, solder lightly, then make your loop so all the individual wires are held together. You can see the loops on the ends of the wire wound resistors to the tag boards in the 3rd photo below. These loops also allow me to neatly and effectively join a wire and a flying lead. Notice that I've cut off the tops of all tags with end cutters so I have 2 effective posts to attach wires to at each tag point allowing me to completely pre-form each wire prior to soldering. Simply form the loop, slip over the post and solder. Schmick!
- Don't allow your wiring to remain unrestrained. Tie it down to something solid so it won't rub/flex/melt/short.......burn!!
- Never leave a soldered joint until you're entirely happy with it. Don't pretend that you'll remember where all the dodgey ones are and you'll come back to it when time permits, and fix them. There is nothing more frustrating than chasing a "dry join" on a circuit this complex. There is no substitute for patience. Your job is only as good as your worst join, so make them all good ones.
- Use a good quality, flowing solder with halogen free flux. I used "WBT" 4% silver, lead based solder on all my amps and it works a treat. Incidentally, it has much the same melt temp as Kester 245. I haven't used Kester products, but if Bruce says they work well,....then they do.
Anyway, I'll get off the "soapbox" now and continue.
The base chassis' are Bruces supplied units with considerable mods. If I were to do this again I'd design and build my own chassis' since it's easier to have the laser cutter do the work rather than modify an existing design. The basket top plate, tube plate and corner posts are billet 6061 Aluminium, CNC milled, then anodized. The rear fascia is laser cut, anodized gold, then photo etched and filled. This process was a disappointment with flaws I've photographed around, and next time I'd use a silk screen method with 2 pack inks.
The "Art Deco" Bars are 3 X 10mm aluminium alloy extrusion, hand linished, anodized, and inset into the fascia. Developing a method to create a square ended slot for these was quite a feat, and I ended up using a laminate trimmer fixed like a router in a router table with an adjustable jig to machine the slots, then developed a tool to punch the ends of the slot square, then finished with a specially ground chisel. Phew!
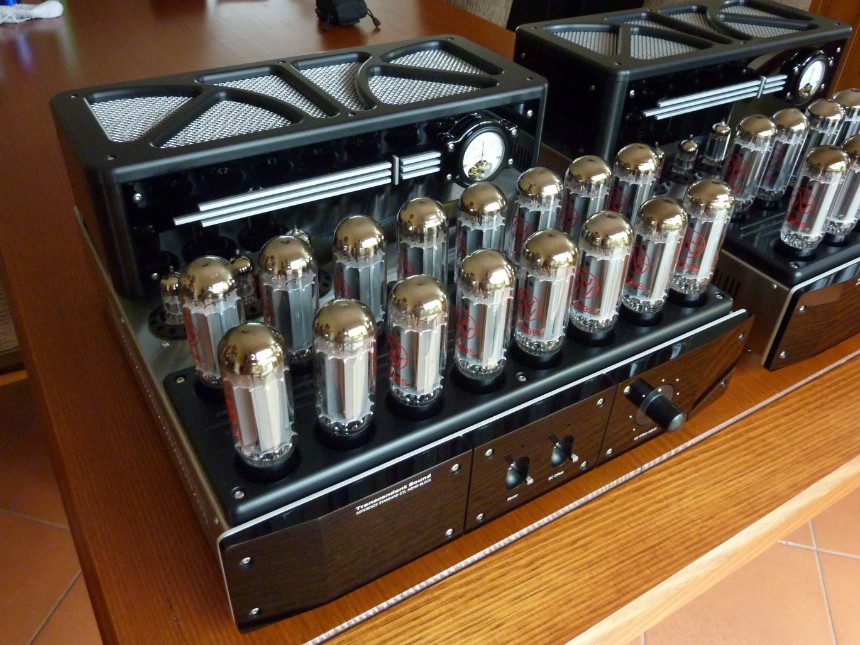
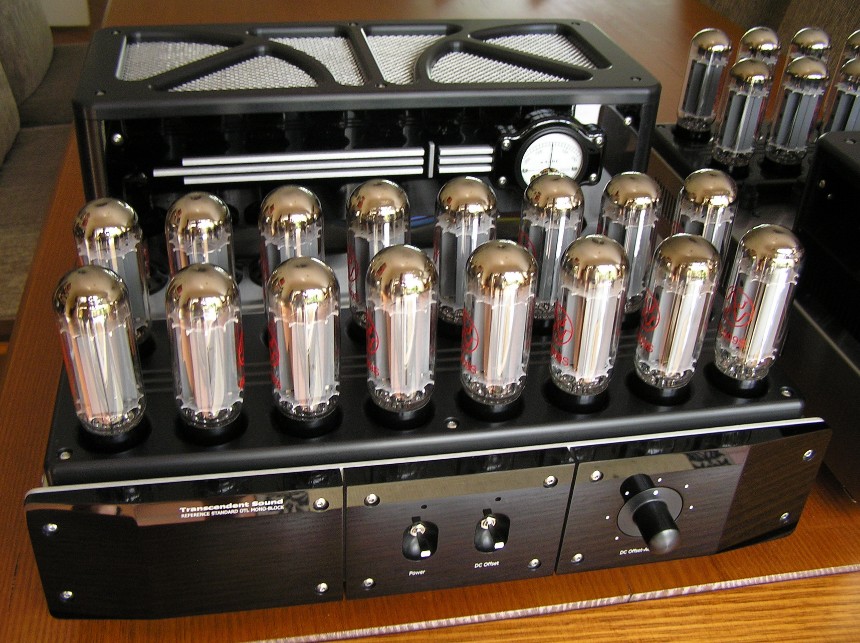
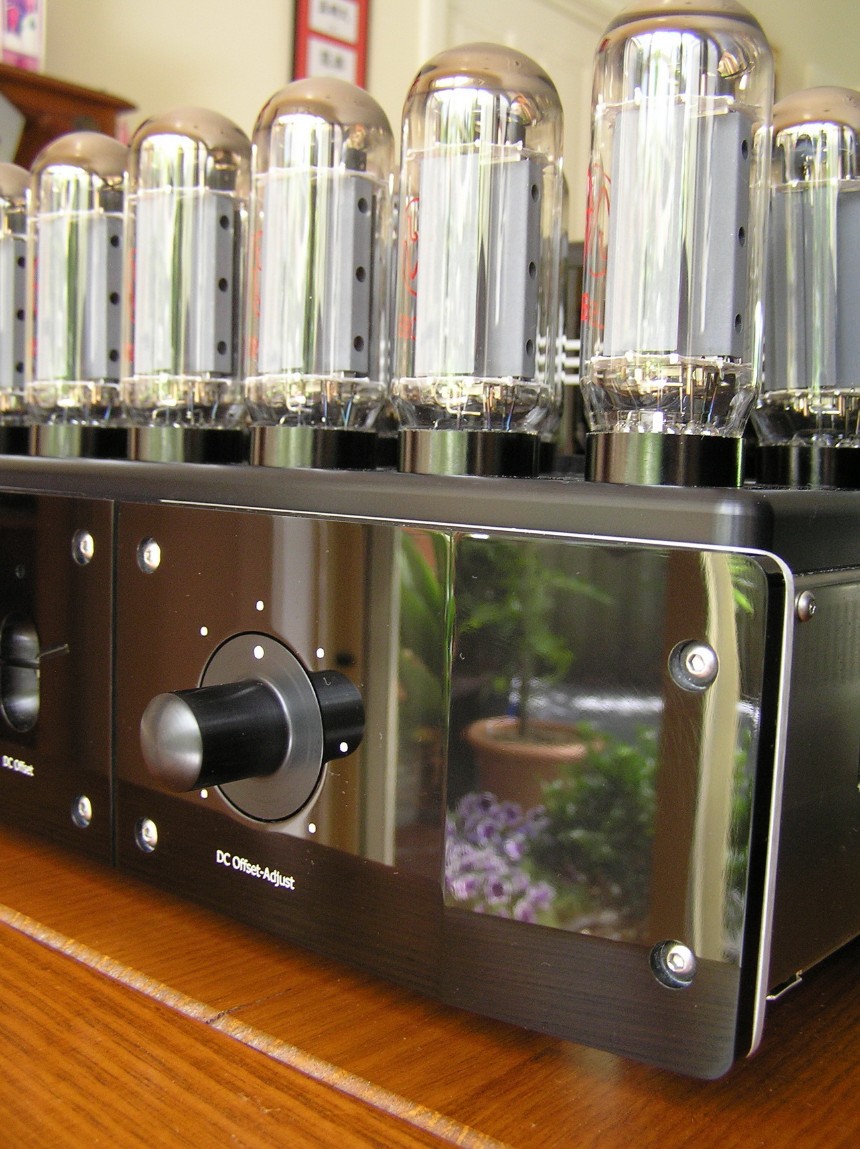
These monos sit in a vertical stand with a shelf about 300mm above them, and reaching over hot tubes to adjust the DC Offset didn't excite me, and trying to read a horizontal edgewise meter from the front was going to be awkward at best, so I replaced the momentary read/adjust switch with a on/off 2A toggle and moved it to the front panel, and also moved the std pot to the front panel. I replaced the edgewise meter with the Hoyt Meter unit mentioned above, and moved it to the convection basket fascia so it can be easily seen from the front. It also runs 4 Leds for illumination so each mono-block can be read and adjusted in the dark if required.
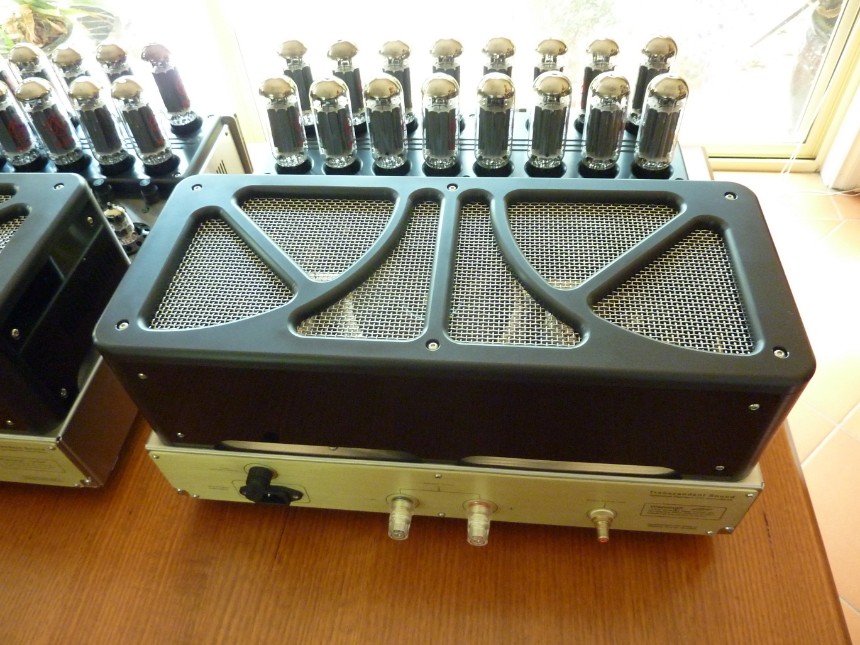
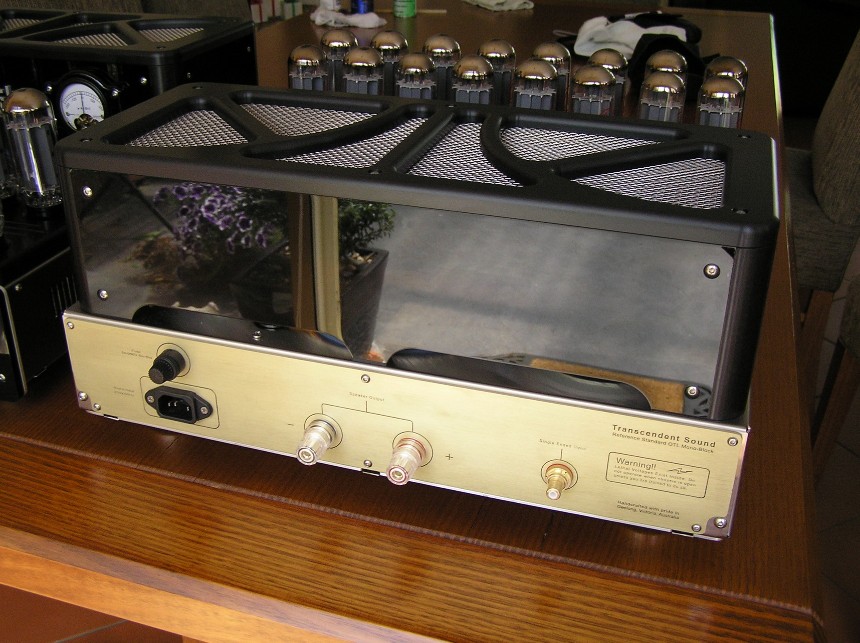
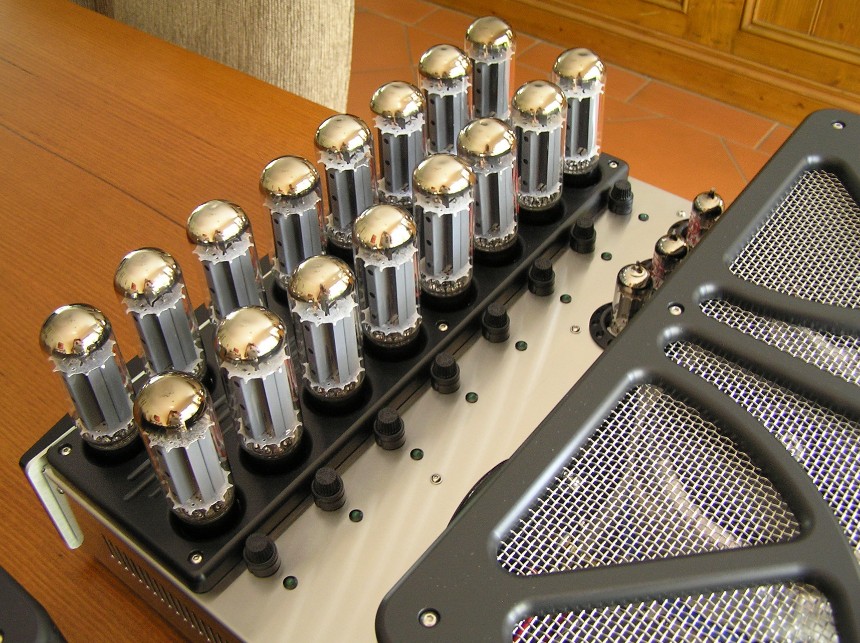
The power switch is also a 2A toggle which won't handle the substantial running current so it actuates a 10A relay at the back of the chassis which you can spot in the bottom right of photo 5. The front fascias are machined acrylic with laser engraved lettering, filled with 'Rub'n'buff' wipe-on paint made for shallow recess filling. Fasteners are 4mm s/steel polished button head socket screws with nyloc nuts. The Convection Baskets faces are 10mm acrylic machined to size with a laminate trimmer. Notice the arched skirt slots all the way around the basket to allow fresh air in to cool the toroids from all sides then vent through the top grill.
I had to design and build these amps without hearing them first, using only the strength of the performances of my modified GG Pre, and Bruce's Phono. They both blew me away, easily cleaning up my ARC LS-7 line stage, and my Electrocompaniet ECP-1 phono.
So, how do the finished Mono's sound? It is of course very system dependent, so my particular system is a "relatively" low cost/high performance arrangement. Consonance Droplet 5.0, with Delta Sigma DAC's, twin triode output CD Player with my own mat design. Pre is a modified GG, stepped attenuator, Mundorf silver/gold signal caps and some other neat stuff. Interconnects are "Osborn" Silverlink pure silver. Speakers are Osborn Opitome with Twin subs. So 4 speaker columns. The Osborns are probably not well known in the States, however they are serious performers using Focal's premium drivers in a 3 way main column dynamic speaker, and Focals also in the subs.They are very efficient at 94Db/W-m. I tri-wire them using Kimber 4TC for the Mid/Tweets, Monster M1 for the bass drivers, and Kordz Master cables for the subs.
Last but not least, is my former power amp, a monster in it's own right, a Music Labs ML-825 Stereo S/State, 250W, high current design. Again, not well known in the states, but many compare it to the Krell KSA 200, in fact it was reported some traded their Krells for this unit. A very dynamic, detailed presentation, "death grip" on base dynamics, and tonally, very accurate below 500 Hz. Reasonably extended highs, a little dry up top as most solid state is, and quite open. All up, a good all round performer and an excellent benchmark.
After the rather tense stages of first switch on, and no smoke, no fire, not even a baby belch from these puppies, I set about run in. It was immediately apparent that they weren't "just better" than my prized ML-825. No,.....they were actually operating at an entirely new plateau of performance. I had 2 dead tubes, so I was running them in 110 W mode, and despite this they creamed the dynamics of my ML. These things are blindingly fast, no nasty output trannies to slow them down. Their response is way down below the the MLs, and way above it. Considering CD playback, their width, and particularly their depth are amazing, not unnaturally so, just as big as the original recording space, large or small. Despite having more tubes than a dialysis machine, they do not sound tube like at all. No, if anything they have the sonic signature of the GG Pre, they sound superbly focused, really fast with great attack, striking timbrel qualities on all acoustic instruments, open and sweet silky highs, not rolled off, just as smooth and clean as you can imagine.There is nothing euphoric about these amps. They are the most accurate power amps I've heard. Am I raving yet,....If I'm not,...I should be!
I can't imagine parting with these amps. I will look no further, ....unless Bruce finds a way to improve the sound of these, but I can't imagine it anytime soon. Their presentation is truly lifelike,..I can give them no higher praise.
So whats next? I've decided to upgrade from my SOTA Saphire/Origin DC Drive/Kiseki Arm Turntable,....but alas, the TW Acustic Raven AC-3 is out of my price bracket,........ so I'm going to design and build my own turntable, based on American, British, and German design criteria. Arm will be a modified "Conductor" linear tracker air brg unit which I've sourced from Leonard himself. Drive will be the remarkable Teres -Verus rim drive from Chris Brady.
Should be a hoot. Stay tuned.
Cheers, Mark Kontjonis,
Victoria, Australia.

These are the Stahlwille Jewelers pliers I used for most of the wiring junctions. Just brilliant.
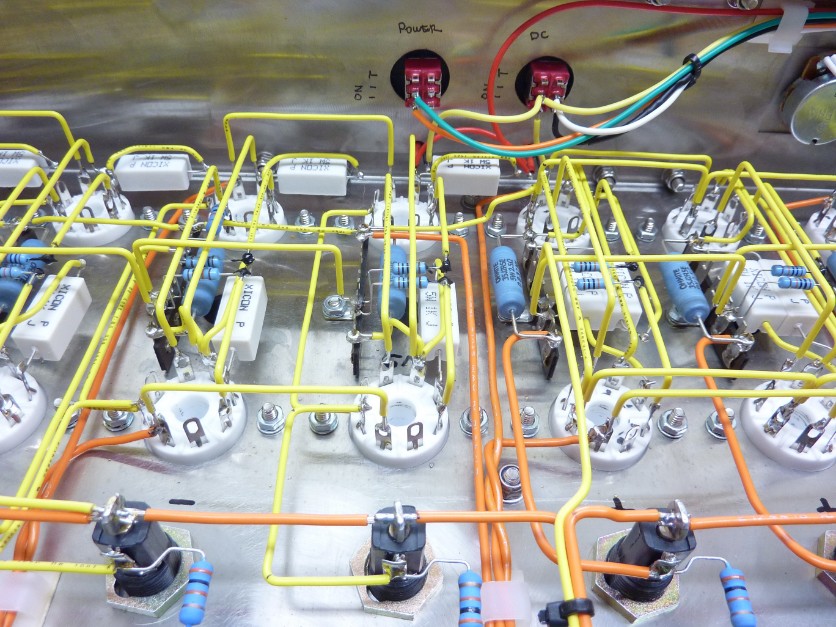
Some of the output stage done with Bruce's std yellow solid core and orange multi strand pre tinned copper wire.
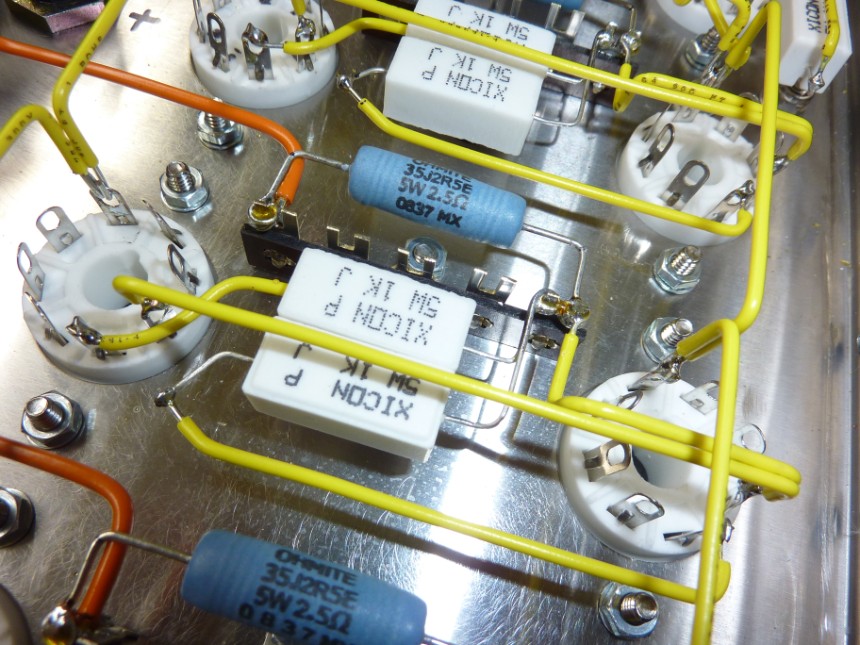
You can see the tops of the Tag Board cut off to create 2 posts for each tag point. Also allows pre-formed wires to simply slip over and solder rather than trying to neatly wrap/wrestle the wires thru the slot with pliers or fingers.
Finished output stage. This wiring method also makes checking/tracing wire runs much easier.
You can see the lighting power board clearly in this shot. The thick twisted blue wire is Neotech 0.8 solid core which is what I used when I ran out of Bruce's suppplied 0.8 solid core. Yes, this method of wiring does use up more wire. You'll notice my copper shield between the high current filament wires and the input wires to prevent any induced hum. But copper only addresses RFI so I ended up attaching a steel sheet to the face to address EMI after this shot was taken. These amps are very quiet indeed.
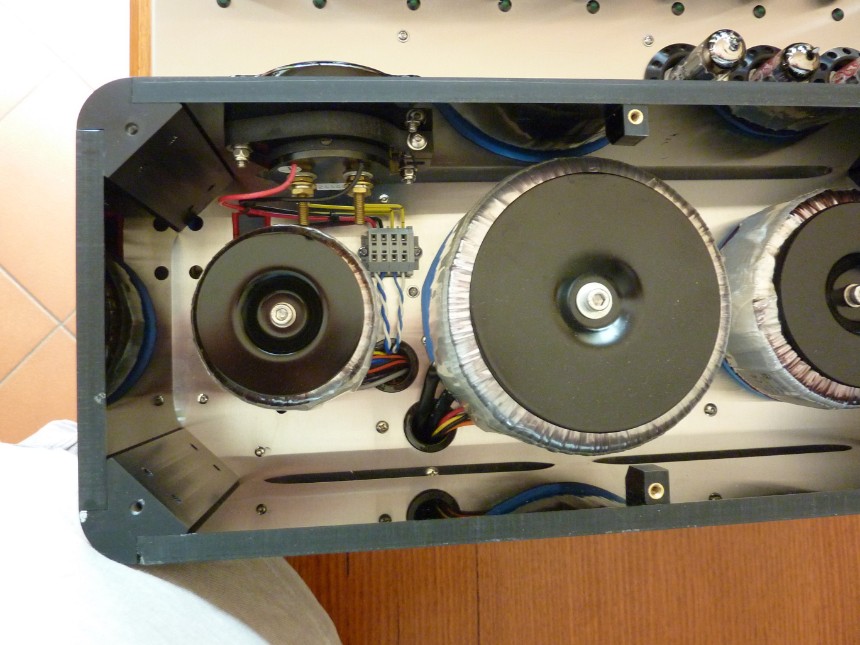
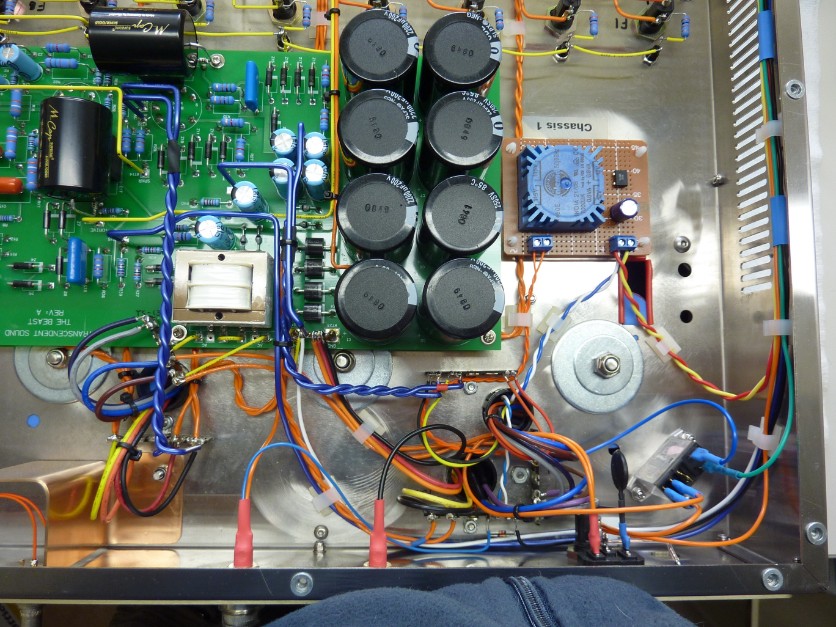
Perhaps not obvious is that the toroids have been shifted forward on the chassis to centre them in the basket. Small terminal block allows the gauge to be removed for service without pulling all the wires. You can see the corner post construction and how they mate with the acrylic face plates. The toroids operate remarkably cooler than expected, which may be a function of the 240V inputs, hence lower amps, or running in 110 W mode, or both.
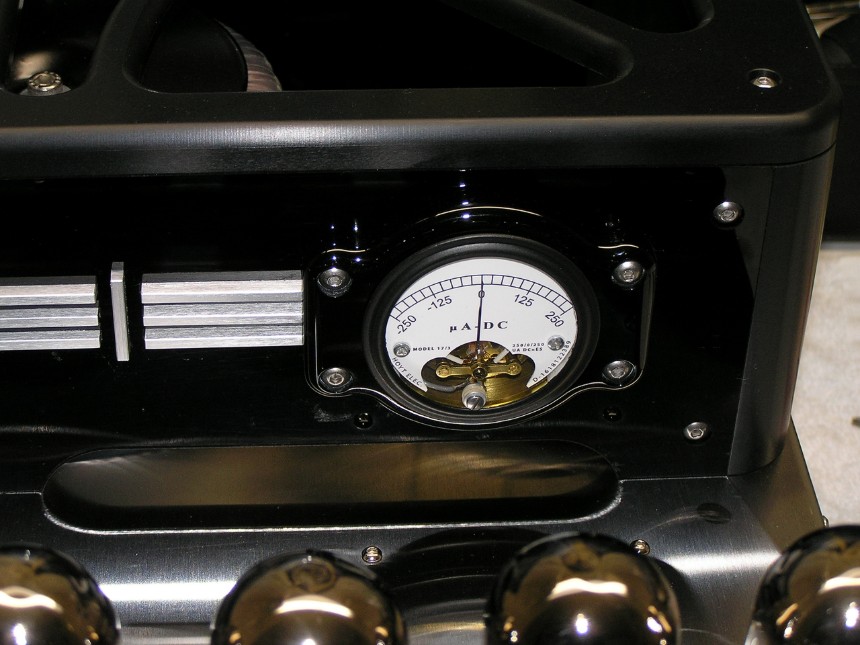
The beautifully made Hoyt Meter, same electrical charateristics as the original edgewise meter, just much tougher. I had the bezel water jet cut, then I hand routed, sanded and hand finished it.
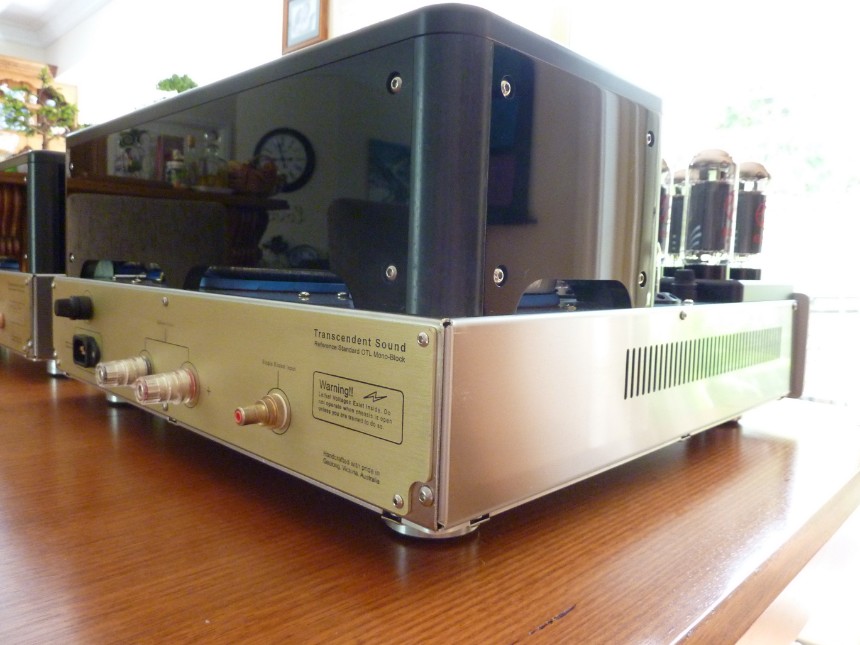
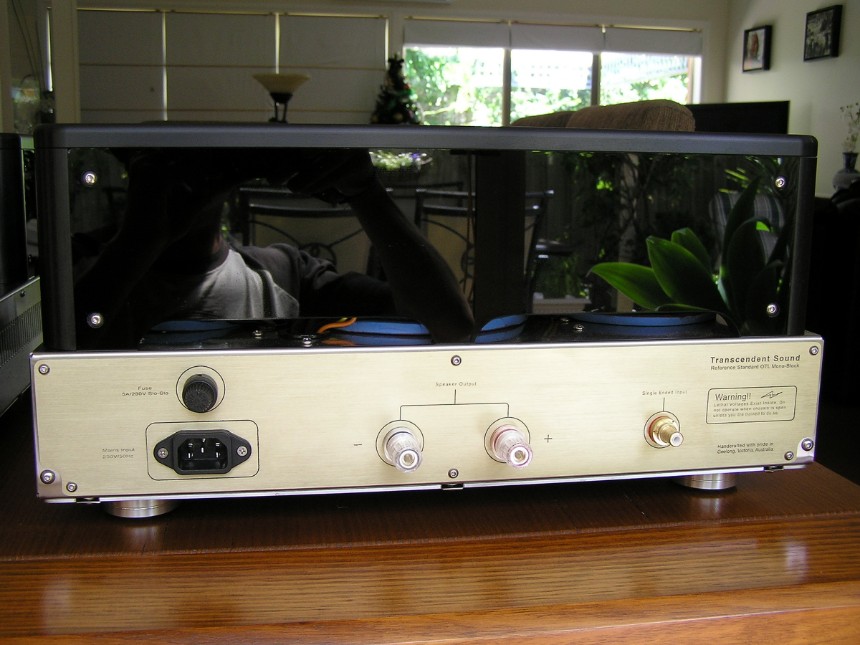
Nice butt. Can you say that about an amplifier? Speaker binding posts and RCA are silver plated copper by CMC.
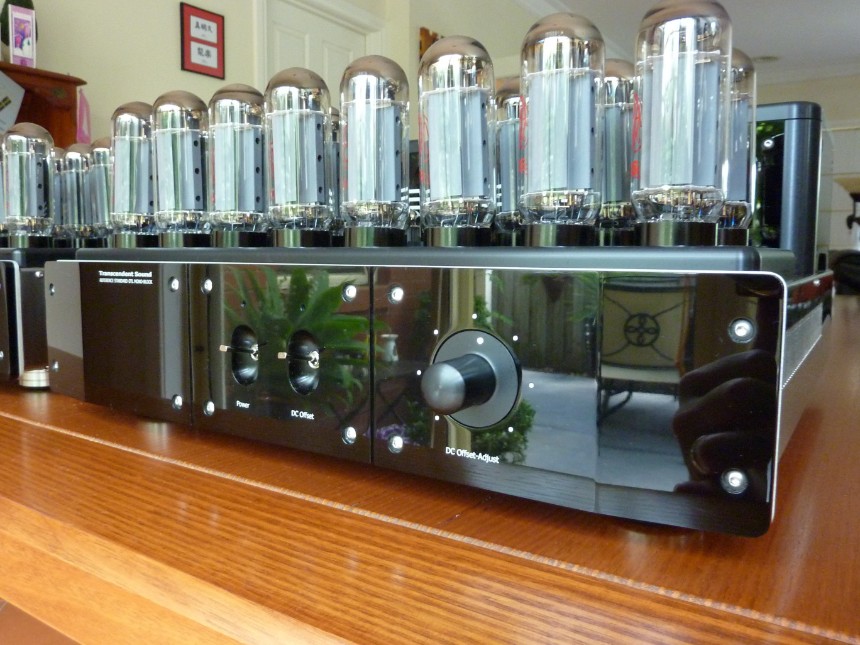
Tubes galore. DC Offset adjust knob is a custom item I spun up in a mate's lathe then anodised. The fascias once machined, were sanded, buffed, then hand rubbed with Honda acrylic polish. Must have bumped that tube on the far left while setting up the shot,...damn clutz.
I was looking for a mix of Art Deco and Contemporary, front fascias and tube plate are contempory while the top plate and bezel/bar work are more Art Deco. Pleasing to my eye anyway,....lucky, cause I'll be looking at them for some time to come......
Looks a bit like a 40's valve radiogram from here.

A pair of these puppies occupy more space than a pregnant St Bernard!!
Yet more gratuitious butt shots.
Feet are a heavy duty billet and rubber affair by a serious US online computer accessory store.


Bezels around driver/splitter tubes are purely aesthetic. I've left plenty of annulus around each tube to allow cooling air from within the chassis to rise up around each tube. LED's are Beldin items with aluminium bezels.
The tube plate is hollowed out underneath to clear the top mounted sockets Bruce supplies.
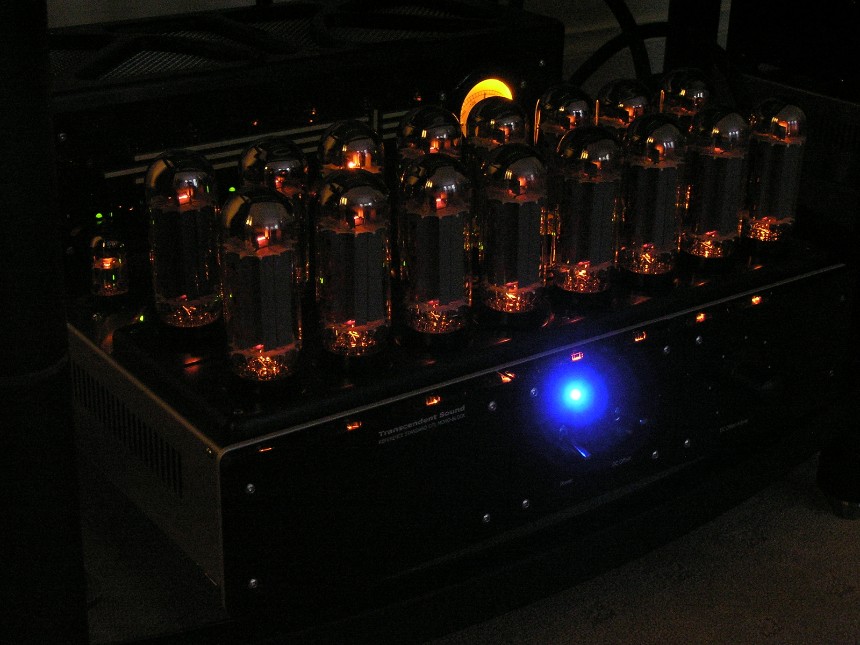
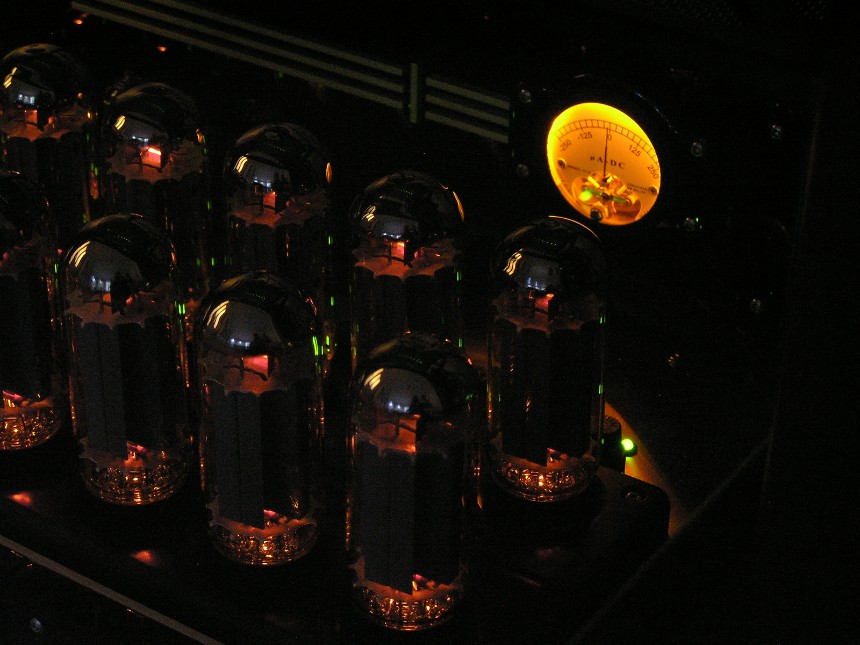
Ever wondered what a Beast looks like at night? Wonder no more. If nothing else, they are spectacular to look at in the dark.

A brace of 509's settling in for another session...........

Hoyt meter is easily ledgible in the dark. No sweat.
Sweet............